How to mask data in Redpanda with Python and DataCater
This tutorial walks you through developing custom data masking functions in Python and applying them to Redpanda topics.
This tutorial walks you through developing custom data masking functions in Python and applying them to Redpanda topics.
Data masking is a technique for removing sensitive information from data
while keeping their original structure. One practical example is
replacing the last block of an IPv4 address with 0s, e.g.,
transforming 194.99.91.179 to 194.99.91.0.
While we can no longer identify specific IP addresses, we keep enough information for making the data useful for purposes, like analytics or testing.
Data masking rules depend a lot on the data and use case; it is very likely that you mask email addresses in a different way than names.
That is, while some SQL dialects offer pre-built functions for masking
data, e.g., ksqlDB’s MASK(),
we are typically better off with implementing data masking in a more flexible language, such as Python.
This article walks you through building custom data masking functions in Python and applying them to data in Redpanda topics. We develop and operate the Python functions with DataCater. Our goal is to build a streaming data pipeline that streams data from one Redpanda topic to another one and applies the data masking function to the data on the way. As a practical example, we mask email addresses.
The learnings can be transferred to various use cases. Consider, for instance, building up a pre-production stage for your Redpanda/Kafka cluster. Using the presented approach, you can stream production data to your pre-production cluster and remove sensitive information on the way.
We used Minikube for developing this tutorial. If you use a different Kubernetes distribution, you might want to use the Helm charts of DataCater and Redpanda Once you installed Minikube, please create a new Kubernetes cluster as follows:
$ minikube start --memory 8192 --cpus 2
In the next step, we install DataCater and Redpanda on the Kubernetes
cluster. To this end, we provide a ready-to-use Kubernetes manifest that
you can apply and install into your default namespace with the following command:
$ kubectl apply -f https://raw.githubusercontent.com/DataCater/datacater/main/k8s-manifests/minikube-with-postgres-and-redpanda.yaml
If you prefer to use a different namespace or if you are not running Minikube, we recommend installing DataCater and Redpanda using Helm.
Let us follow the progress of the installation with
$ kubectl get pods --watch.
Once completed, you should see that all pods are ready and running:
$ kubectl get pods --watch
NAME                                                    READY   STATUS    RESTARTS        AGE
datacater-0                                             1/1     Running   0               4d13h
datacater-pg-0                                          1/1     Running   0               4d17h
python-runner-0                                         1/1     Running   0               159m
python-runner-1                                         1/1     Running   0               158m
python-runner-2                                         1/1     Running   0               158m
python-runner-3                                         1/1     Running   0               158m
python-runner-4                                         1/1     Running   0               159m
redpanda-0                                              1/1     Running   2 (6d23h ago)   12d
ui                                                      1/1     Running   0               4d13h
Next, please make sure that you can access both Redpanda and DataCater from outside of the Kubernetes cluster.
For accessing Redpanda from your host machine, please create a port forward:
$ kubectl port-forward redpanda-0 9093:9093
You also need to add the following line to your /etc/hosts file to make sure that the ADVERTISED_LISTENER is resolving correctly:
127.0.0.1 redpanda-0.redpanda.default.svc.cluster.local.
You can access DataCater running inside the Kubernetes cluster by creating a port forward to the UI pod:
$ kubectl port-forward ui 8080:8080
Please confirm that the port forward is working by either visiting
http://localhost:8080
in your web browser and signing in with the username admin and password admin or creating an access token via the API:
$ curl -uadmin:admin -XPOST http://localhost:8080/api/v1/authentication
{"token_type":"Bearer","access_token":"[HERE_COMES_THE_ACCESS_TOKEN]","expires_in":604800}
Let us prepare Redpanda by creating two topics. The first topic, users,
is used to store user data in the JSON format. Each record features fields, such as
an email address, a name, etc. We use this topic as the source of our
streaming data pipeline.
The second topic, users_masked,
is used to store the masked user data. We use it as the sink of our
pipeline.
We can execute the following commands to create the topics:
$ kubectl exec -it redpanda-0 -- rpk topic create users --brokers='redpanda-0.redpanda.default.svc.cluster.local.:9093'
$ kubectl exec -it redpanda-0 -- rpk topic create users_masked --brokers='redpanda-0.redpanda.default.svc.cluster.local.:9093'
Next, we load test data into the users topic. To this end, you can use the following Python script. Before executing it (on your host),
please make sure that you have installed the dependencies by running python3 -m pip install Faker kafka-python.
from kafka import KafkaProducer
from faker import Faker
import json

fake = Faker()

producer = KafkaProducer(
    bootstrap_servers = "localhost:9093",
    key_serializer    = lambda k: json.dumps(k).encode('ascii'),
    value_serializer  = lambda v: json.dumps(v).encode('ascii')
)

for i in range(10000):
  producer.send(
    "users",
    key = { "entry": i },
    value = {
      "ip":       fake.ipv4(),
      "username": fake.simple_profile()["username"],
      "email":    fake.ascii_company_email(),
      "name":     fake.name(),
      "message":  fake.text(max_nb_chars=1024)
    }
  )
You should now see data arriving in Redpanda when running the following command:
$ kubectl exec -it redpanda-0 -- rpk topic consume users --brokers='redpanda-0.redpanda.default.svc.cluster.local.:9093'
DataCater provides Streams as a building block for integrating with any Kafka API-compatible service, like Redpanda.
Please head over to http://localhost:8080, sign in with admin:admin
unless already authenticated, and navigate to Streams. After clicking Create new Stream, you can provide the configuration of the Redpanda/Kafka topic:
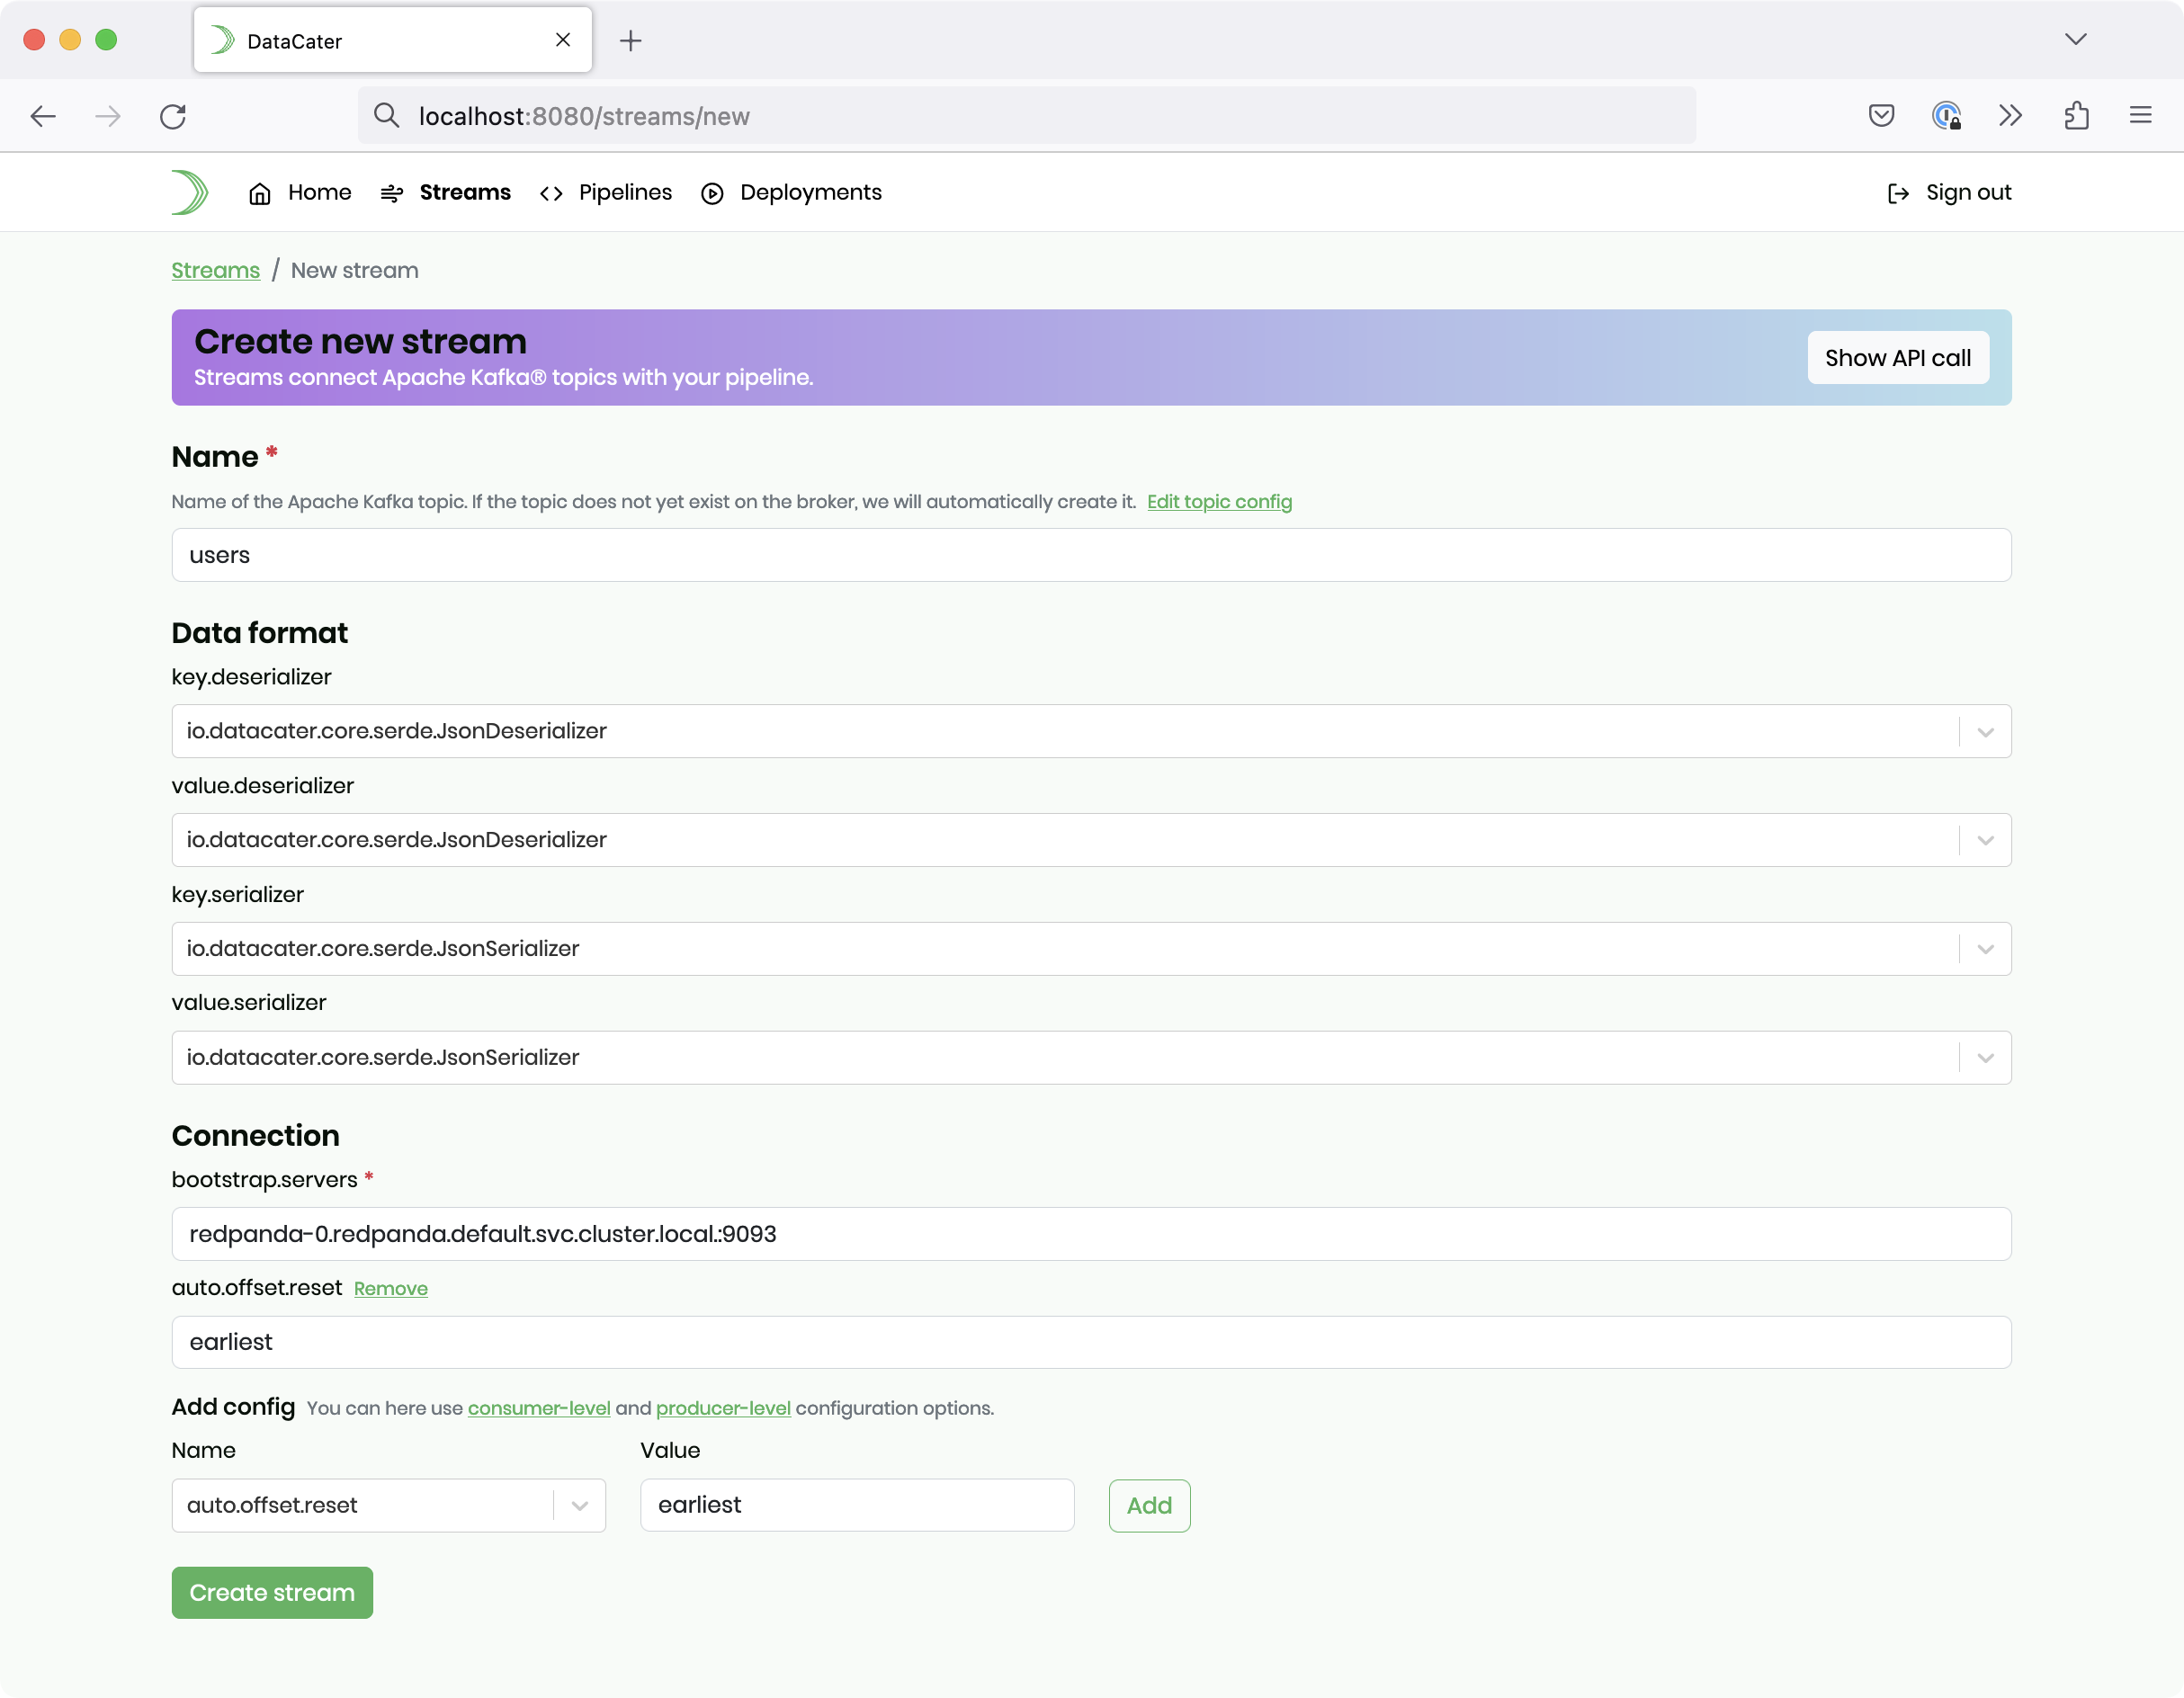
Please provide the value users for the configuration option name and the
value redpanda-0.redpanda.default.svc.cluster.local.:9093 for the configuration option bootstrap.servers.
For this source stream, please also set the connection option auto.offset.reset to earliest.
Finally, click the button Create stream.
After creating the first stream, please head back to the Create new Stream page. This time,
please provide the value users_masked for the configuration option name and the
value redpanda-0.redpanda.default.svc.cluster.local.:9093 for the configuration option bootstrap.servers.
Again, click the button Create stream to persist the stream.
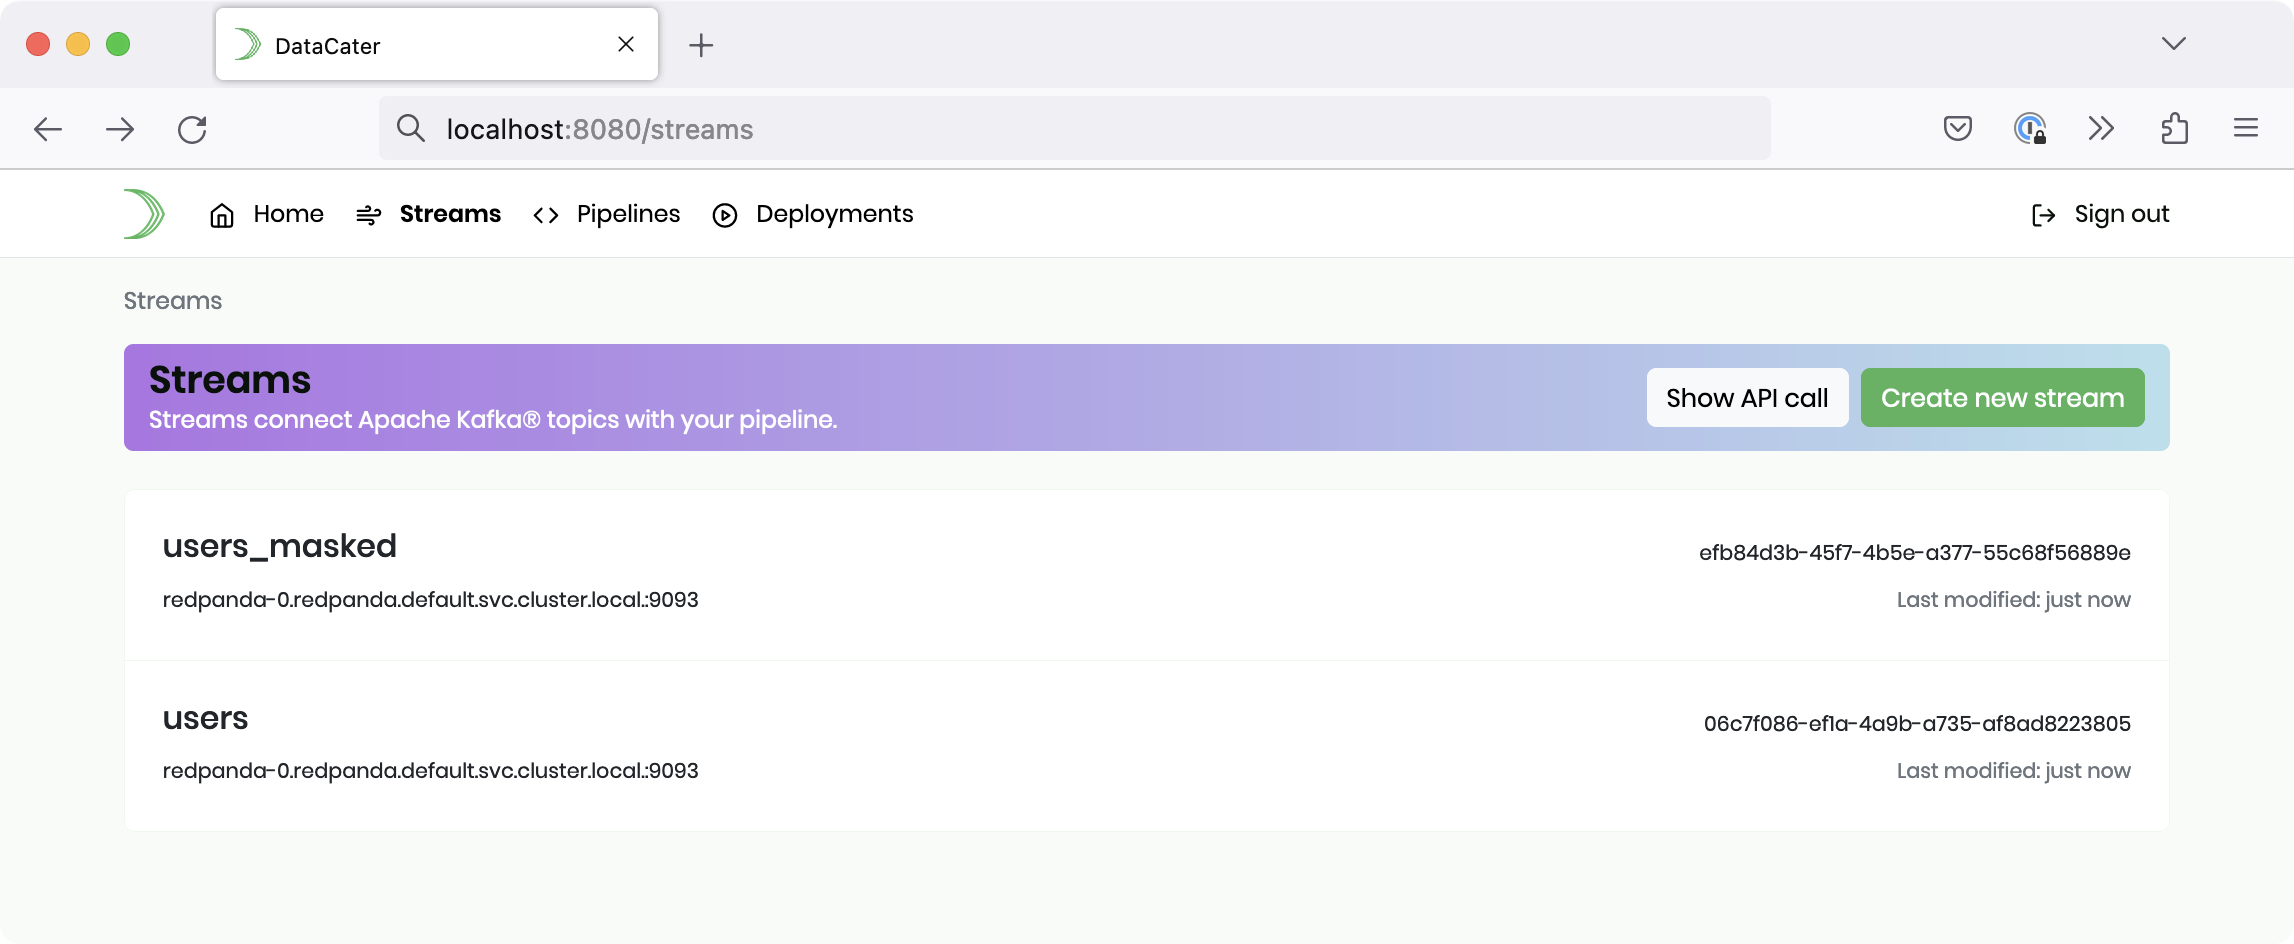
You should now see both streams when navigating to Streams:
Alternatively, you could also use DataCater’s API to create the streams.
In the first step, please retrieve a valid access token for performing API calls:
$ curl -uadmin:admin -XPOST http://localhost:8080/api/v1/authentication
{"token_type":"Bearer","access_token":"[ACCESS_TOKEN]","expires_in":604800}
In the next steps, perform the following API calls for creating the
streams (please make sure to replace ACCESS_TOKEN with the one you retrieved in the previous step):
$ curl http://localhost:8080/api/v1/streams \
  -H'Authorization: Bearer ACCESS_TOKEN' \
  -XPOST \
  -H'Content-Type:application/json' \
  -d'{"name":"users","spec":{"kafka":{"topic":{"config":{}},"bootstrap.servers":"redpanda-0.redpanda.default.svc.cluster.local.:9093","auto.offset.reset":"earliest"},"kind":"KAFKA"}}'
$ curl http://localhost:8080/api/v1/streams \
  -H'Authorization: Bearer ACCESS_TOKEN' \
  -XPOST \
  -H'Content-Type:application/json' \
  -d'{"name":"users_masked","spec":{"kafka":{"topic":{"config":{}},"bootstrap.servers":"redpanda-0.redpanda.default.svc.cluster.local.:9093"},"kind":"KAFKA"}}'
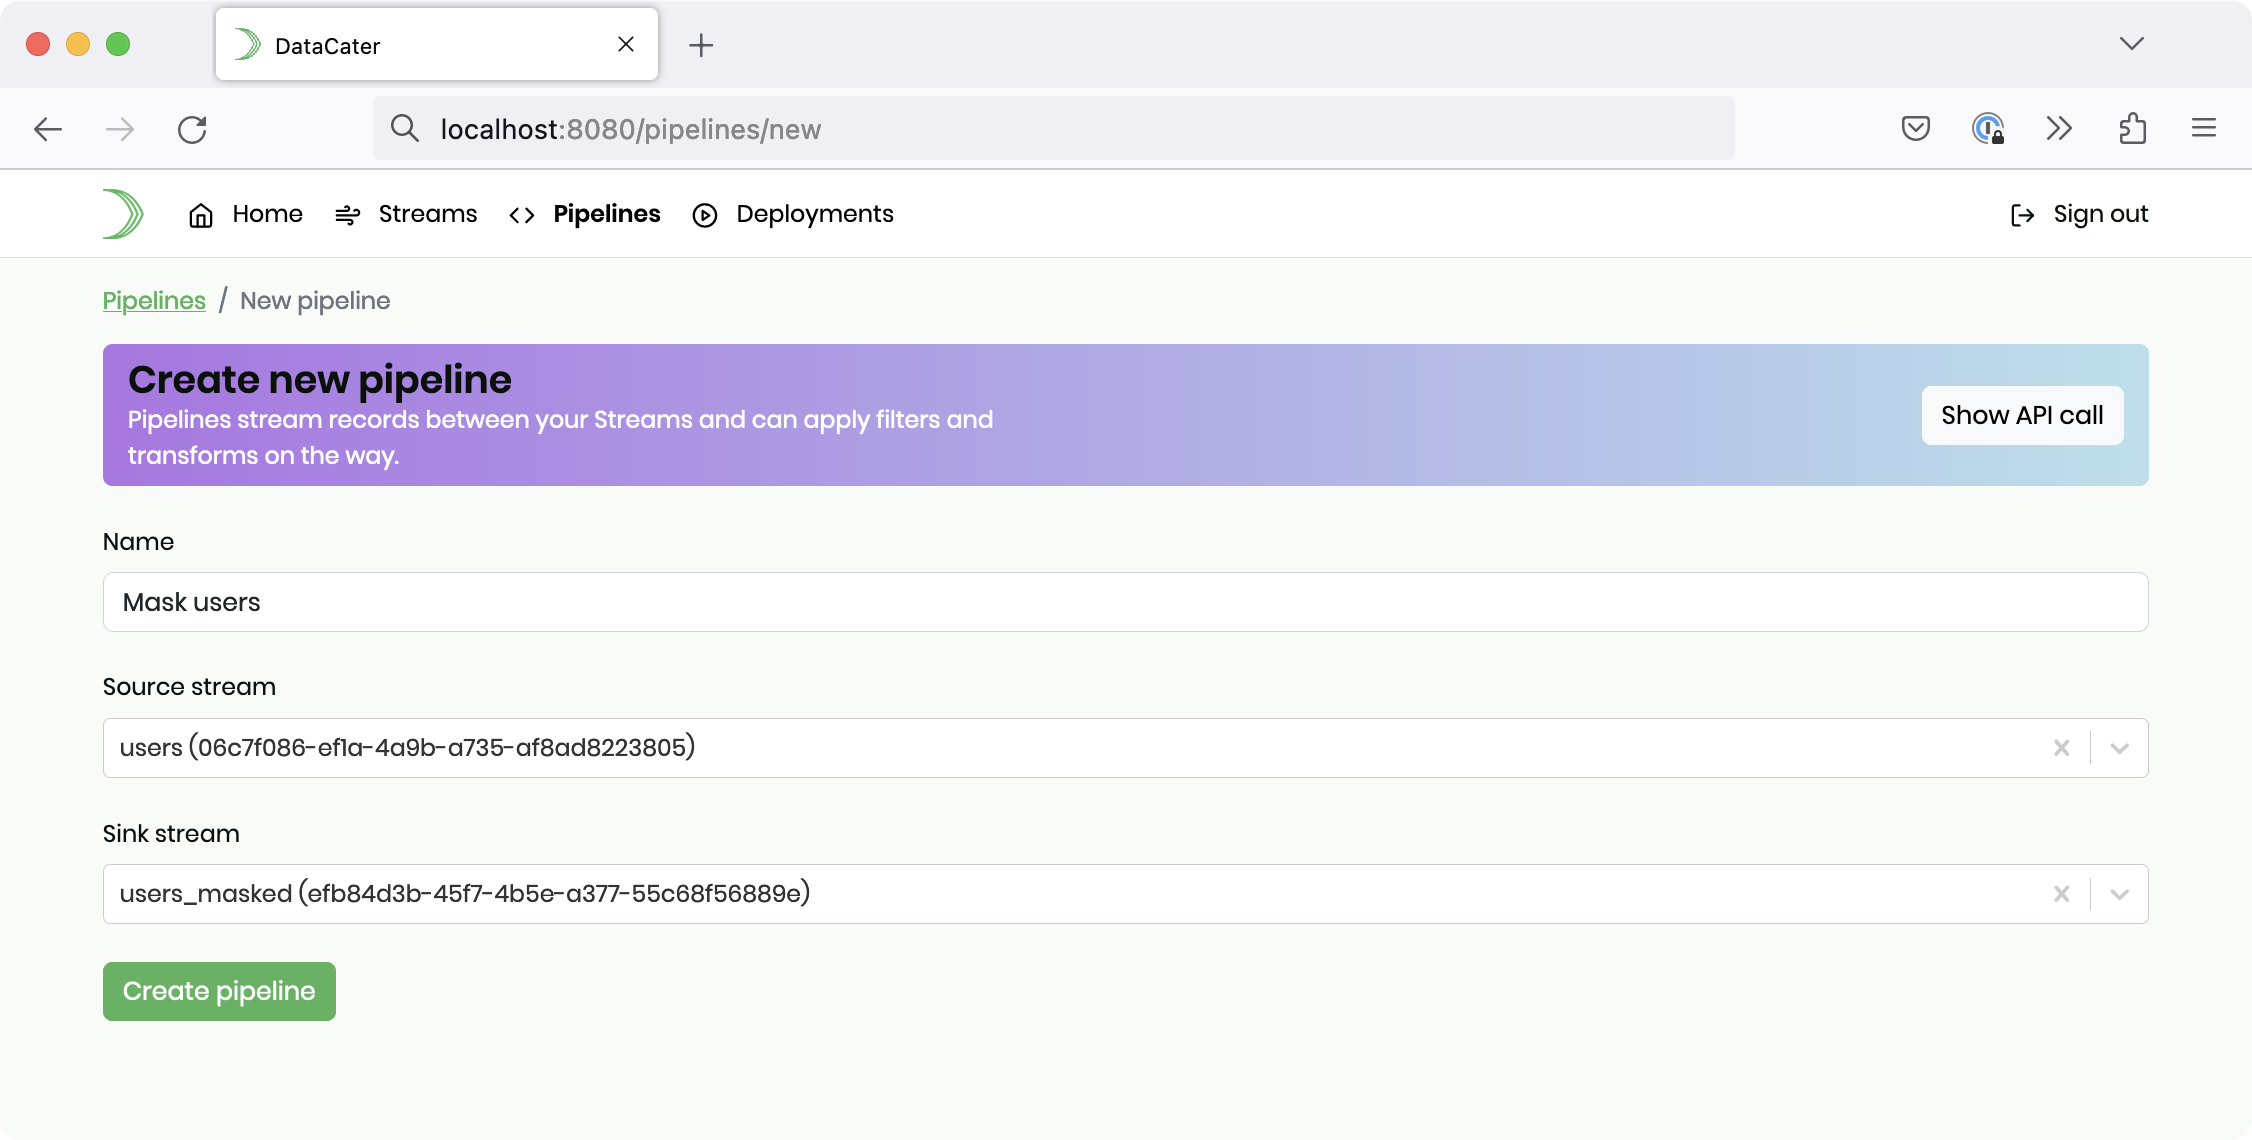
In DataCater’s UI, navigate to Pipelines and click Create new pipeline.
Please provide a name for your pipeline, for instance, Mask users, choose the stream with the name users as Source stream,
and select the stream with the name users_masked as Sink stream. Finally, click the button Create pipeline.
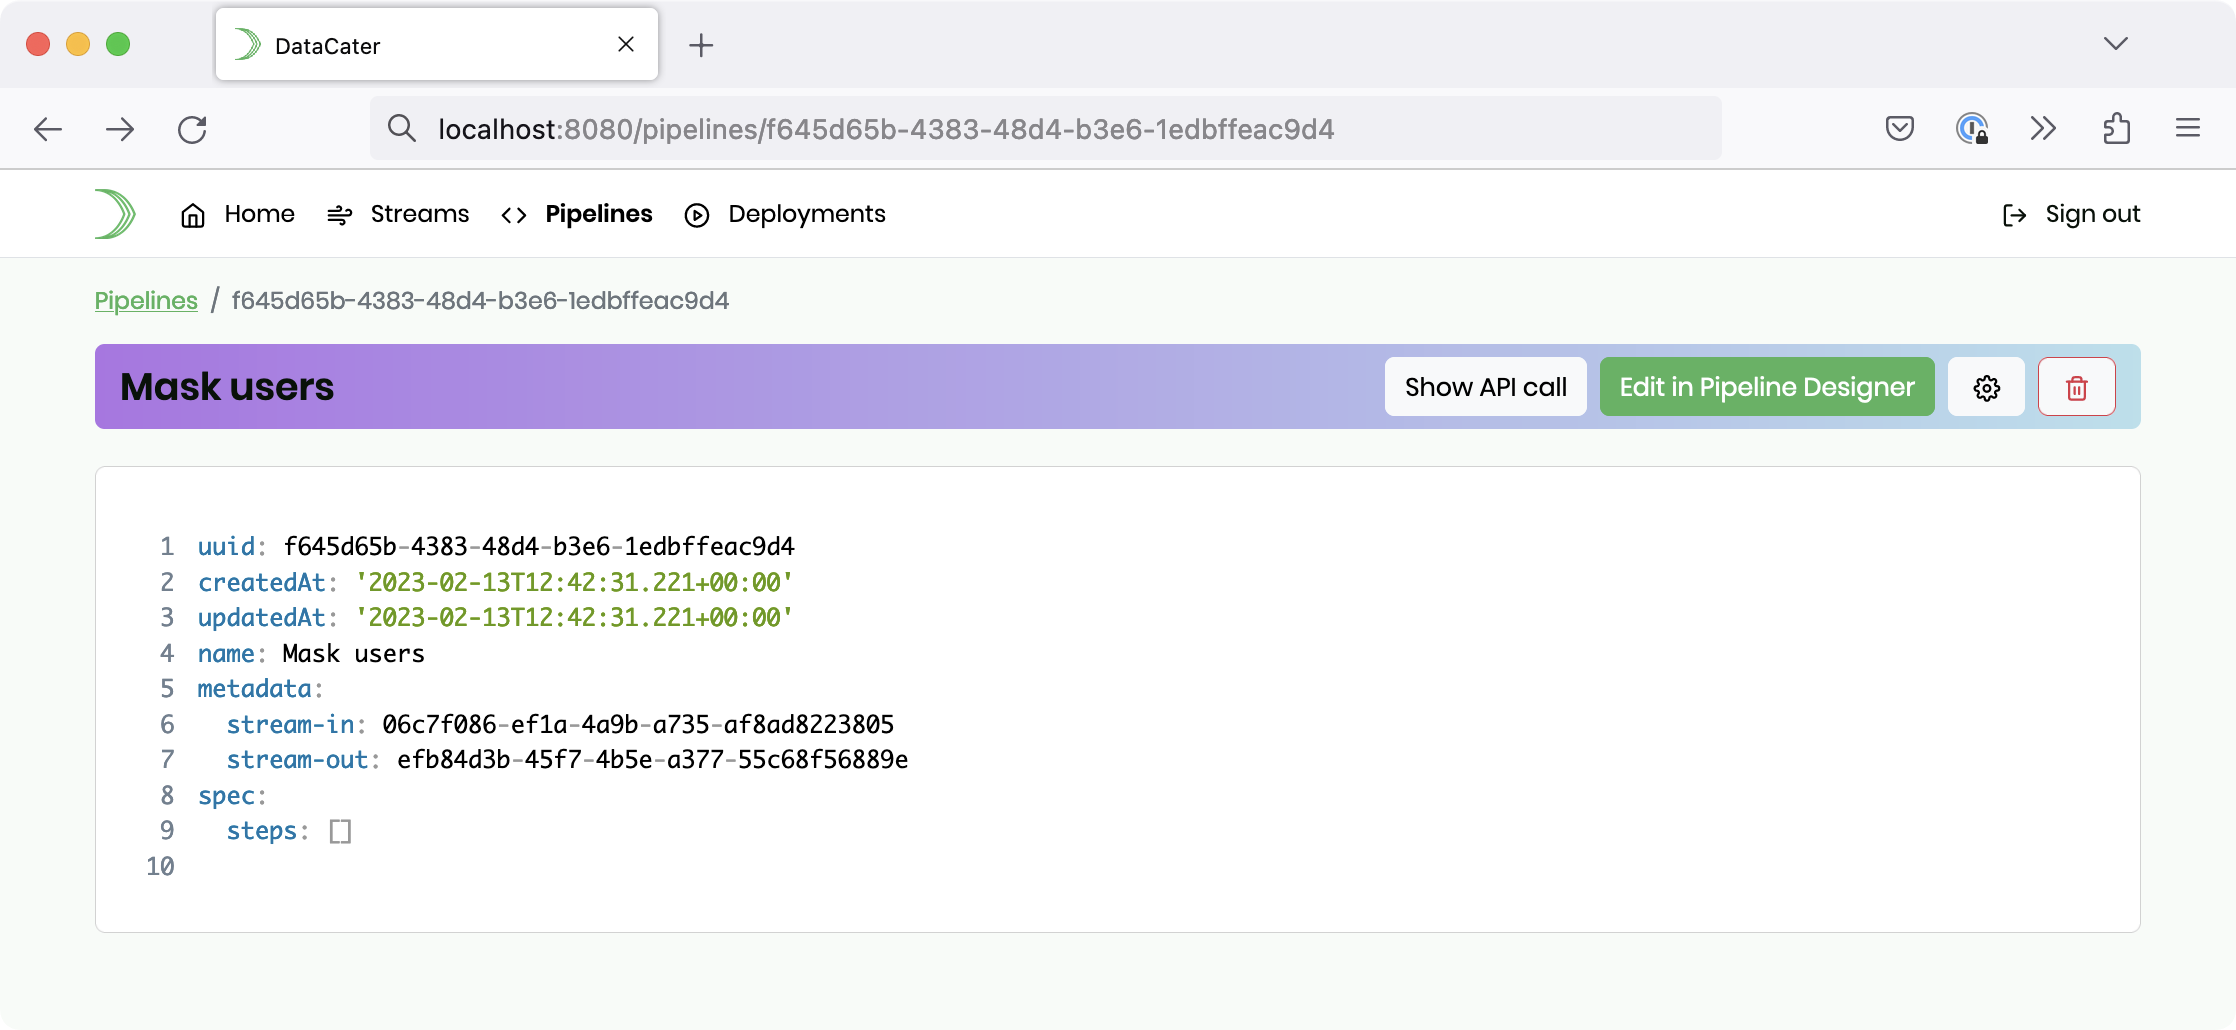
After being redirected to the newly-created pipeline resource, please click the button Edit in Pipeline Designer:
DataCater’s Pipeline Designer extracts a sample from the underlying Redpanda/Kafka topic and lets you interactively develop a streaming data pipeline. While you apply filters and transforms, the Pipeline Designer previews their impact on the sample instantly.
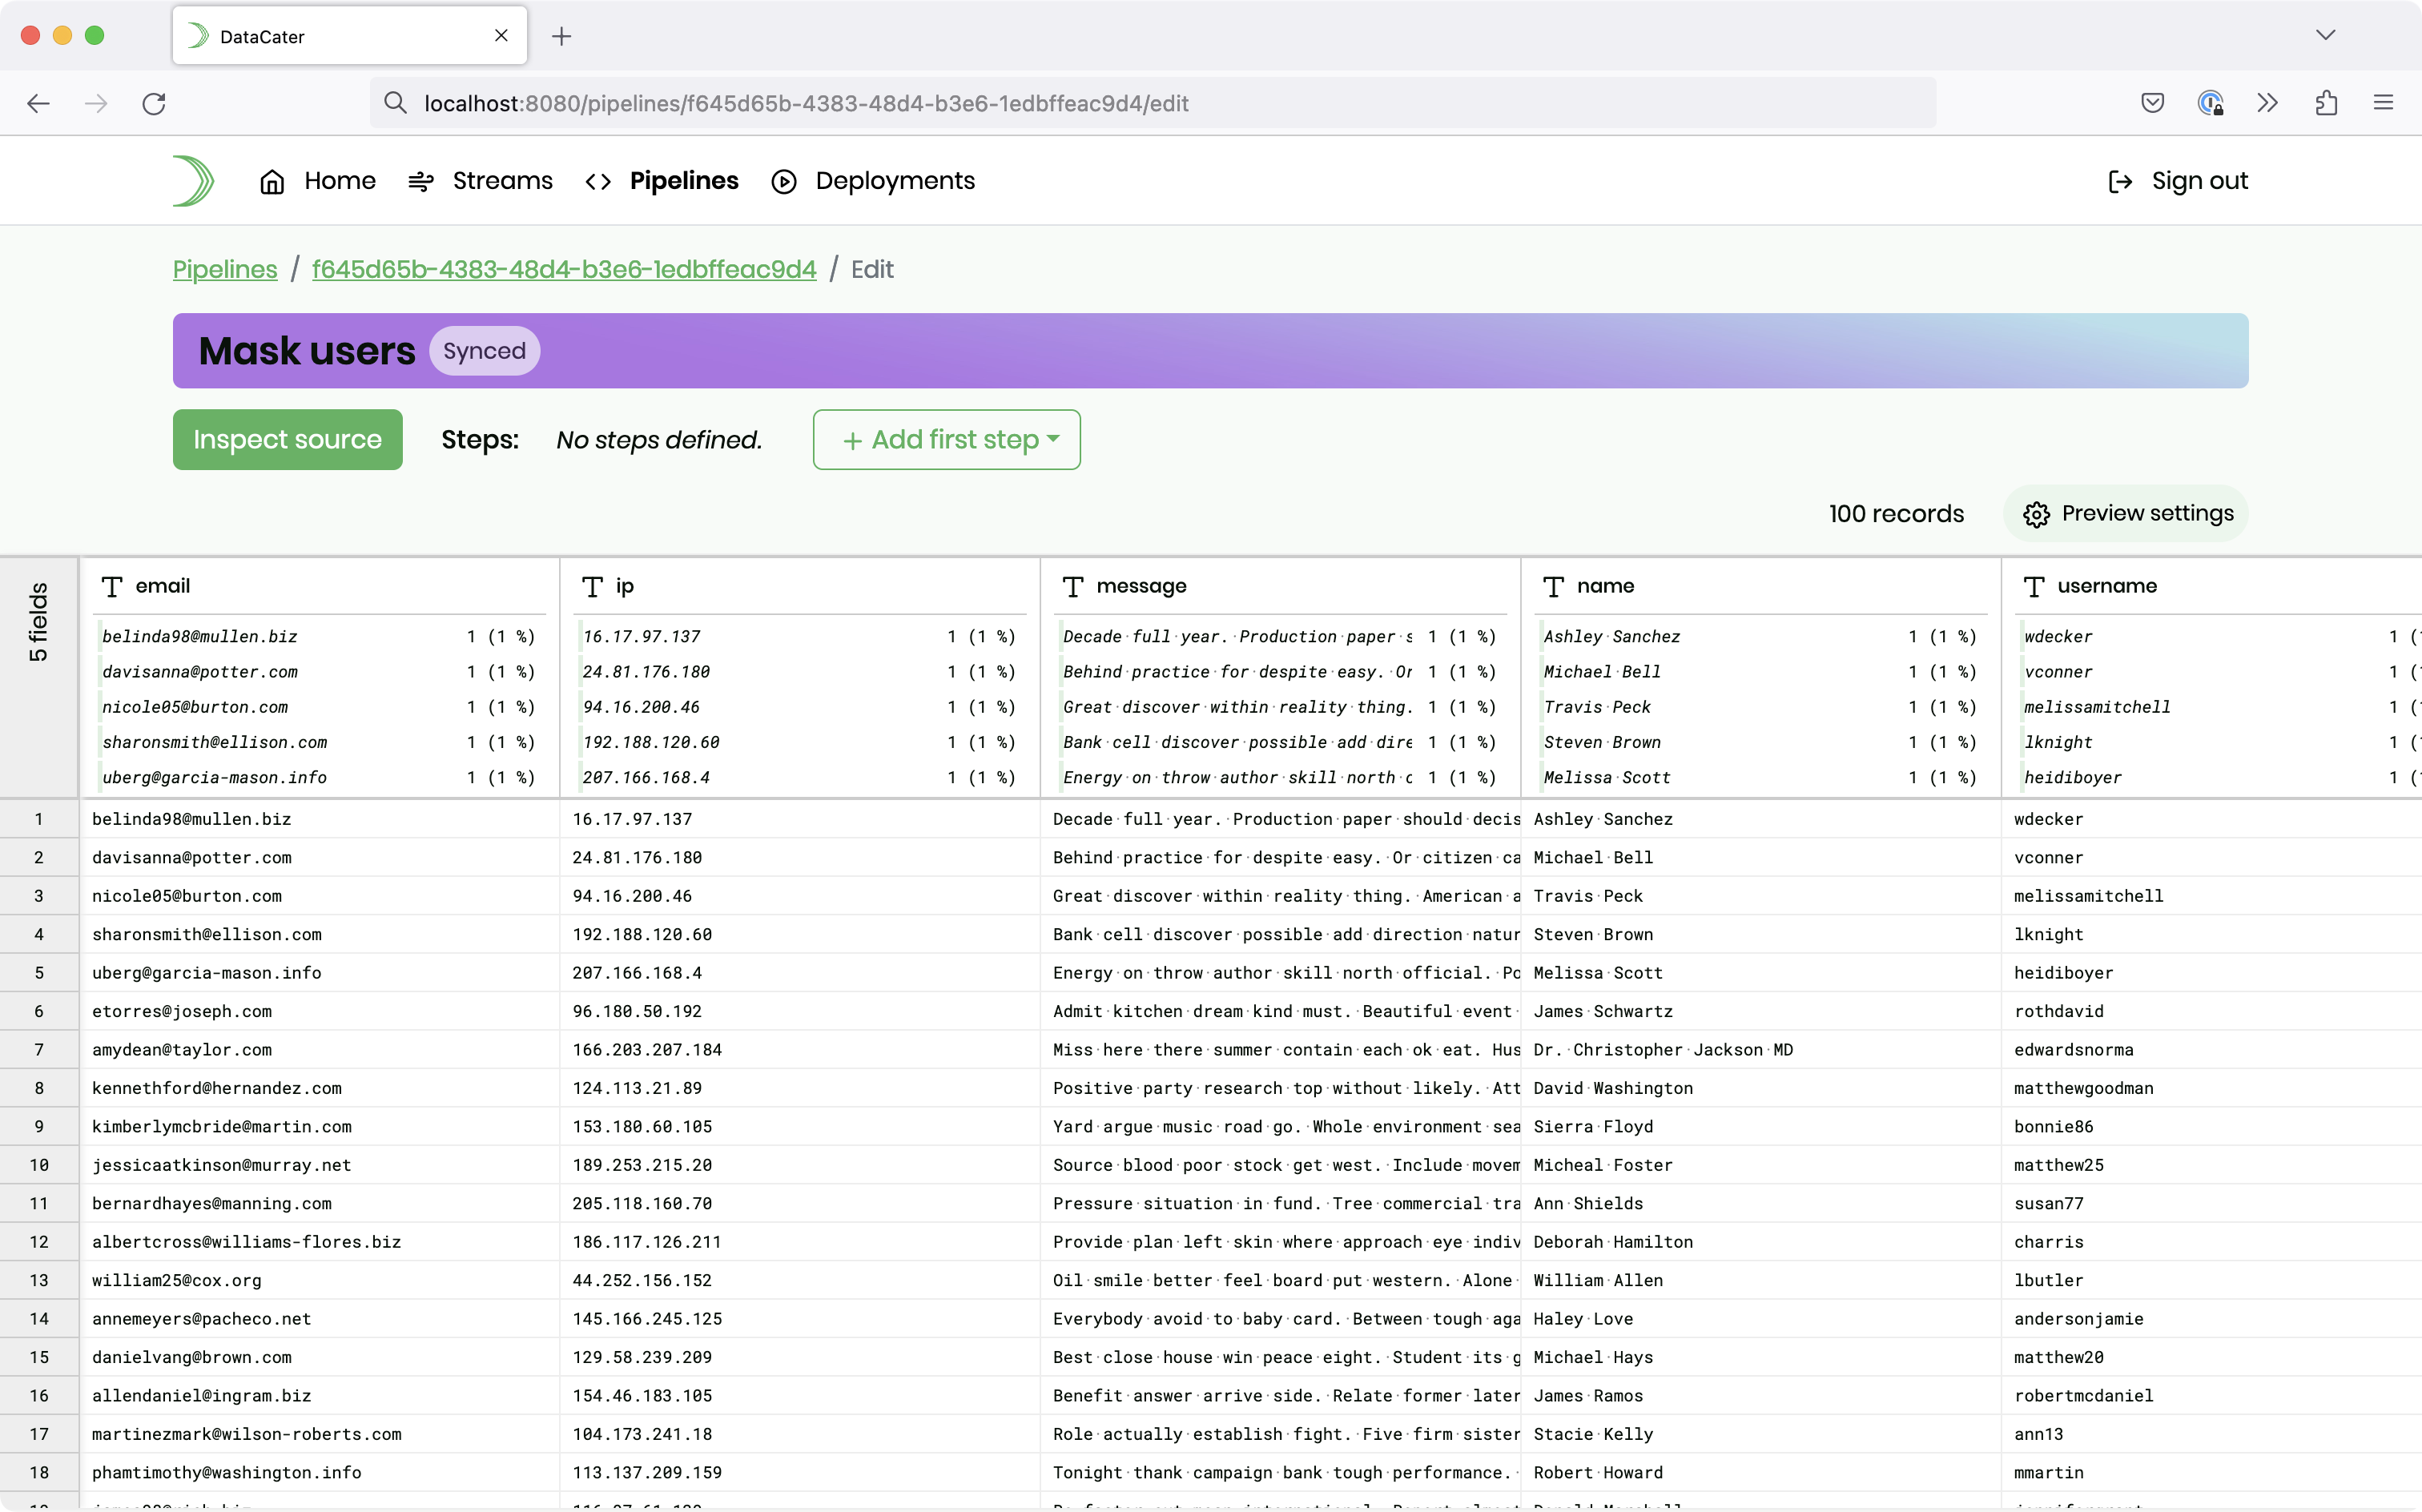
In this example, we want to mask the field email.
Please click the button Add first step and choose Transform single fields:
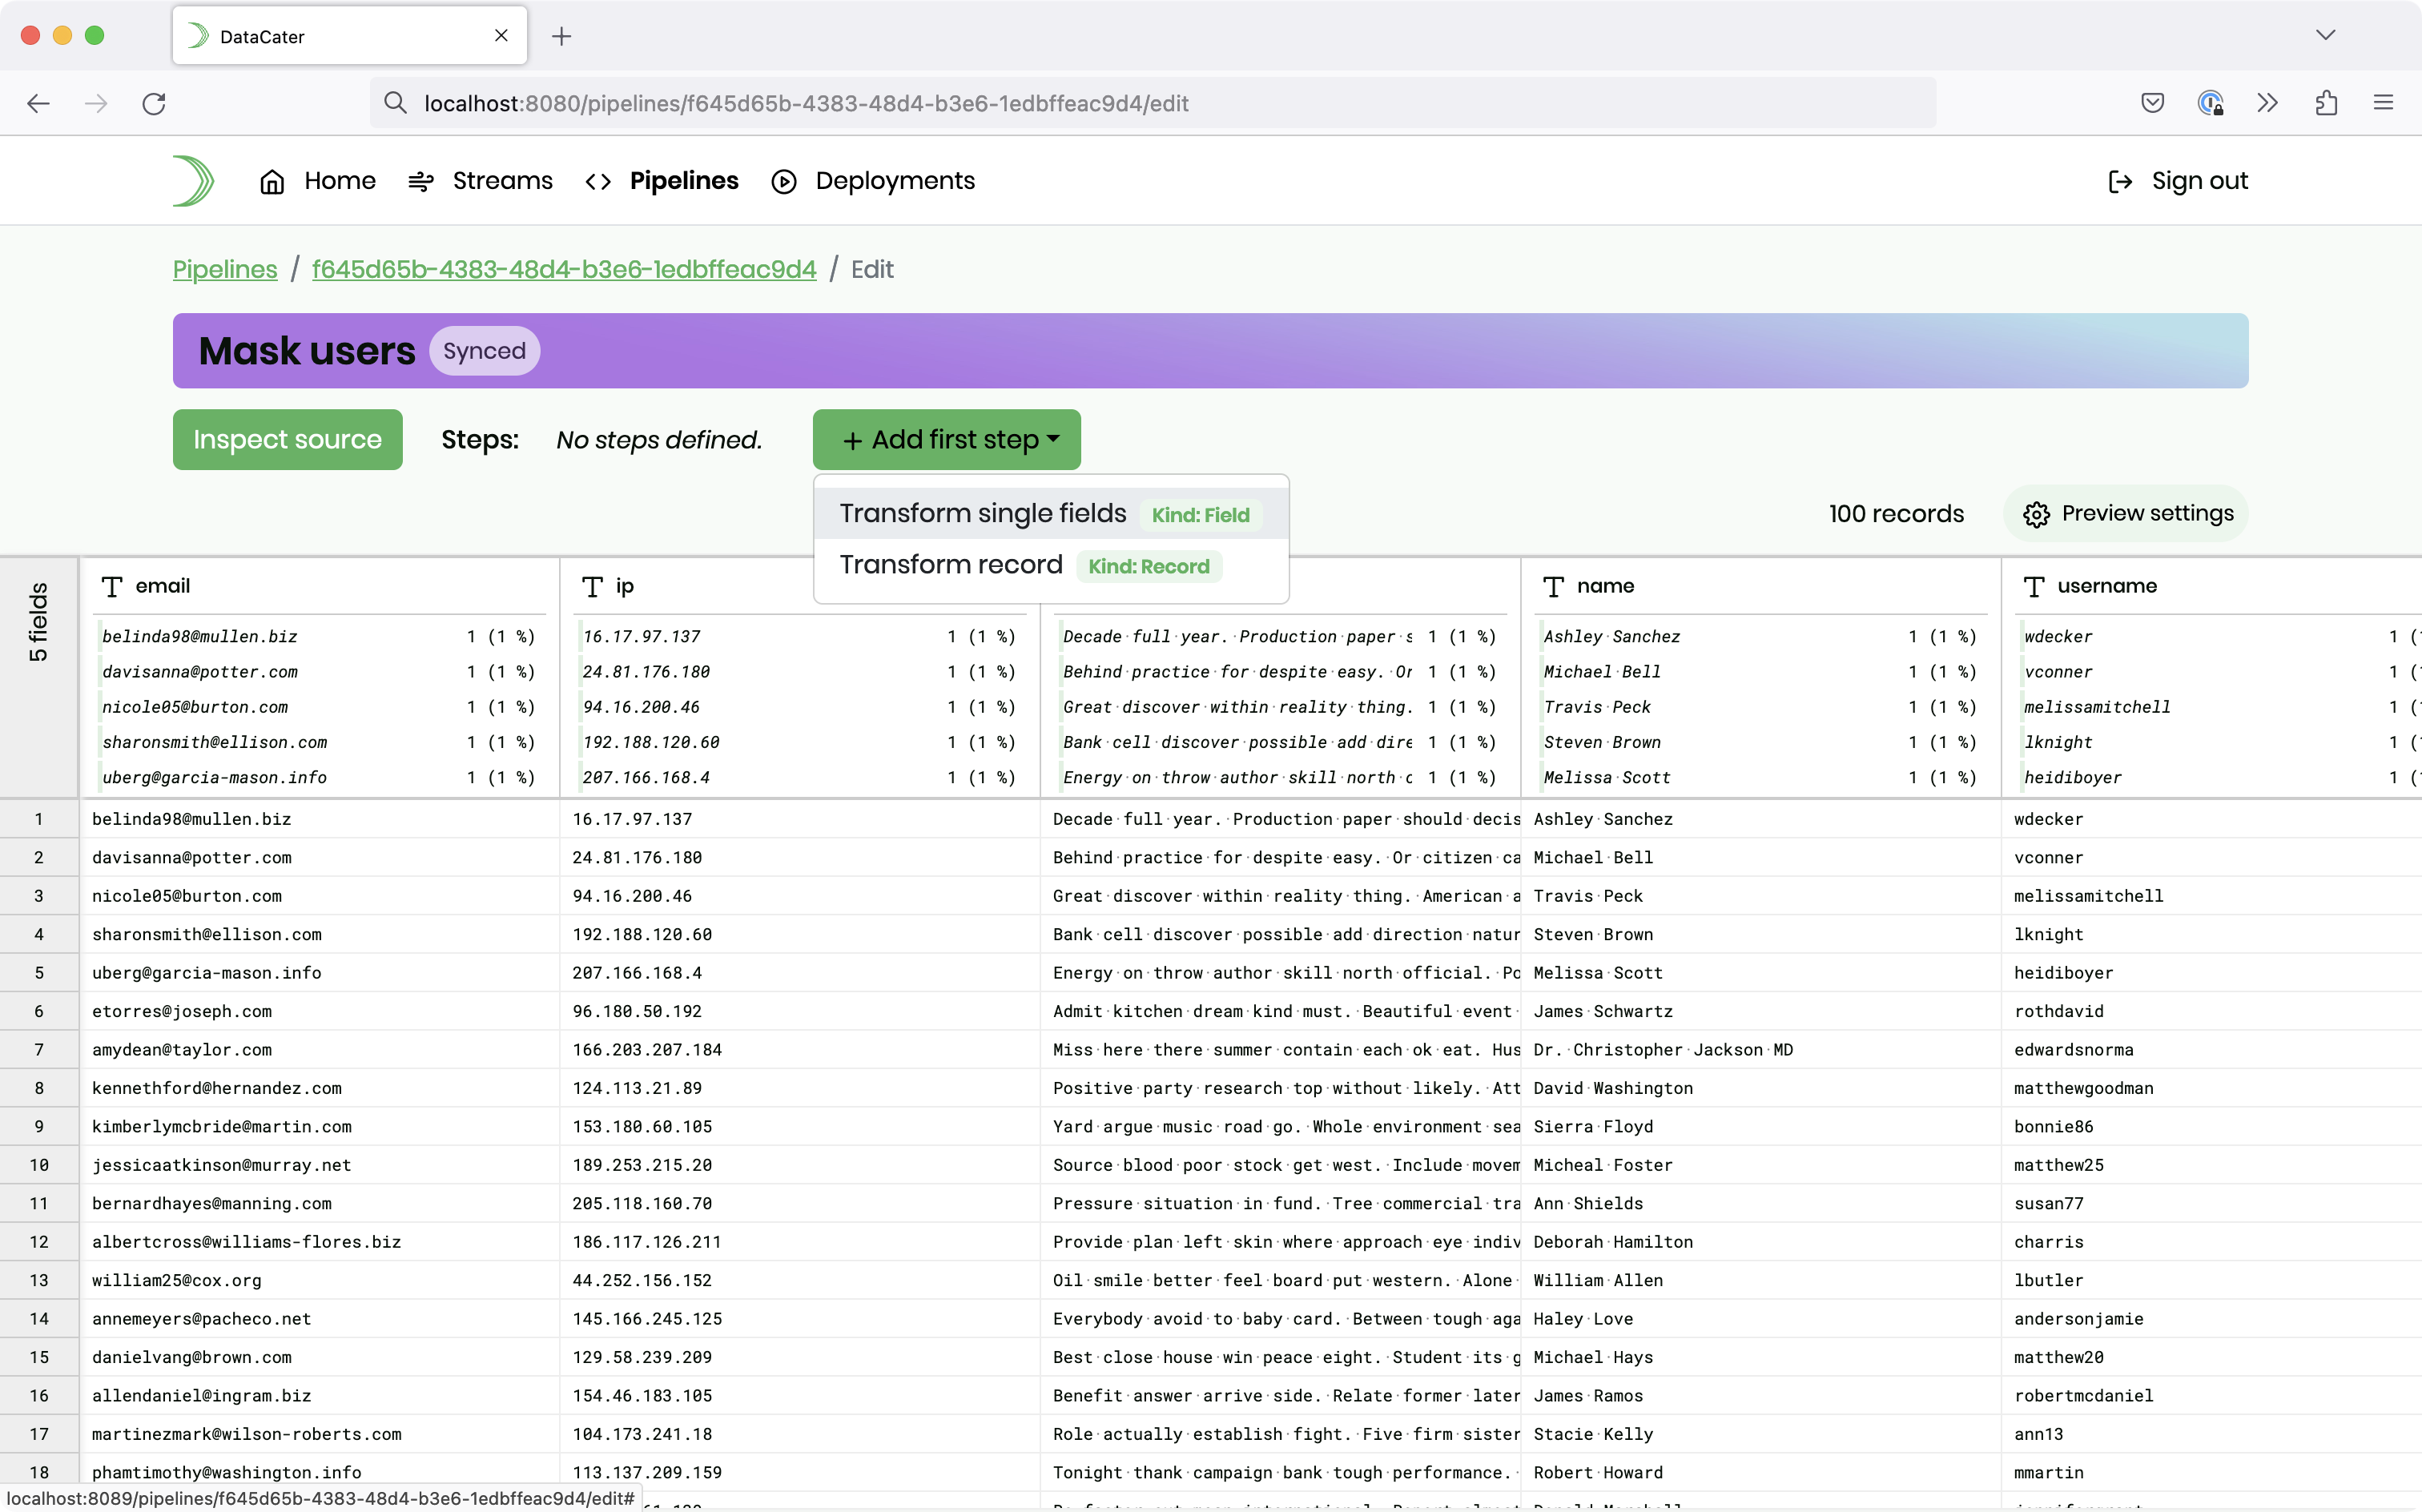
Click on the button Apply transform or filter in the column of the email field. Next, choose User-defined transform in the sidebar:
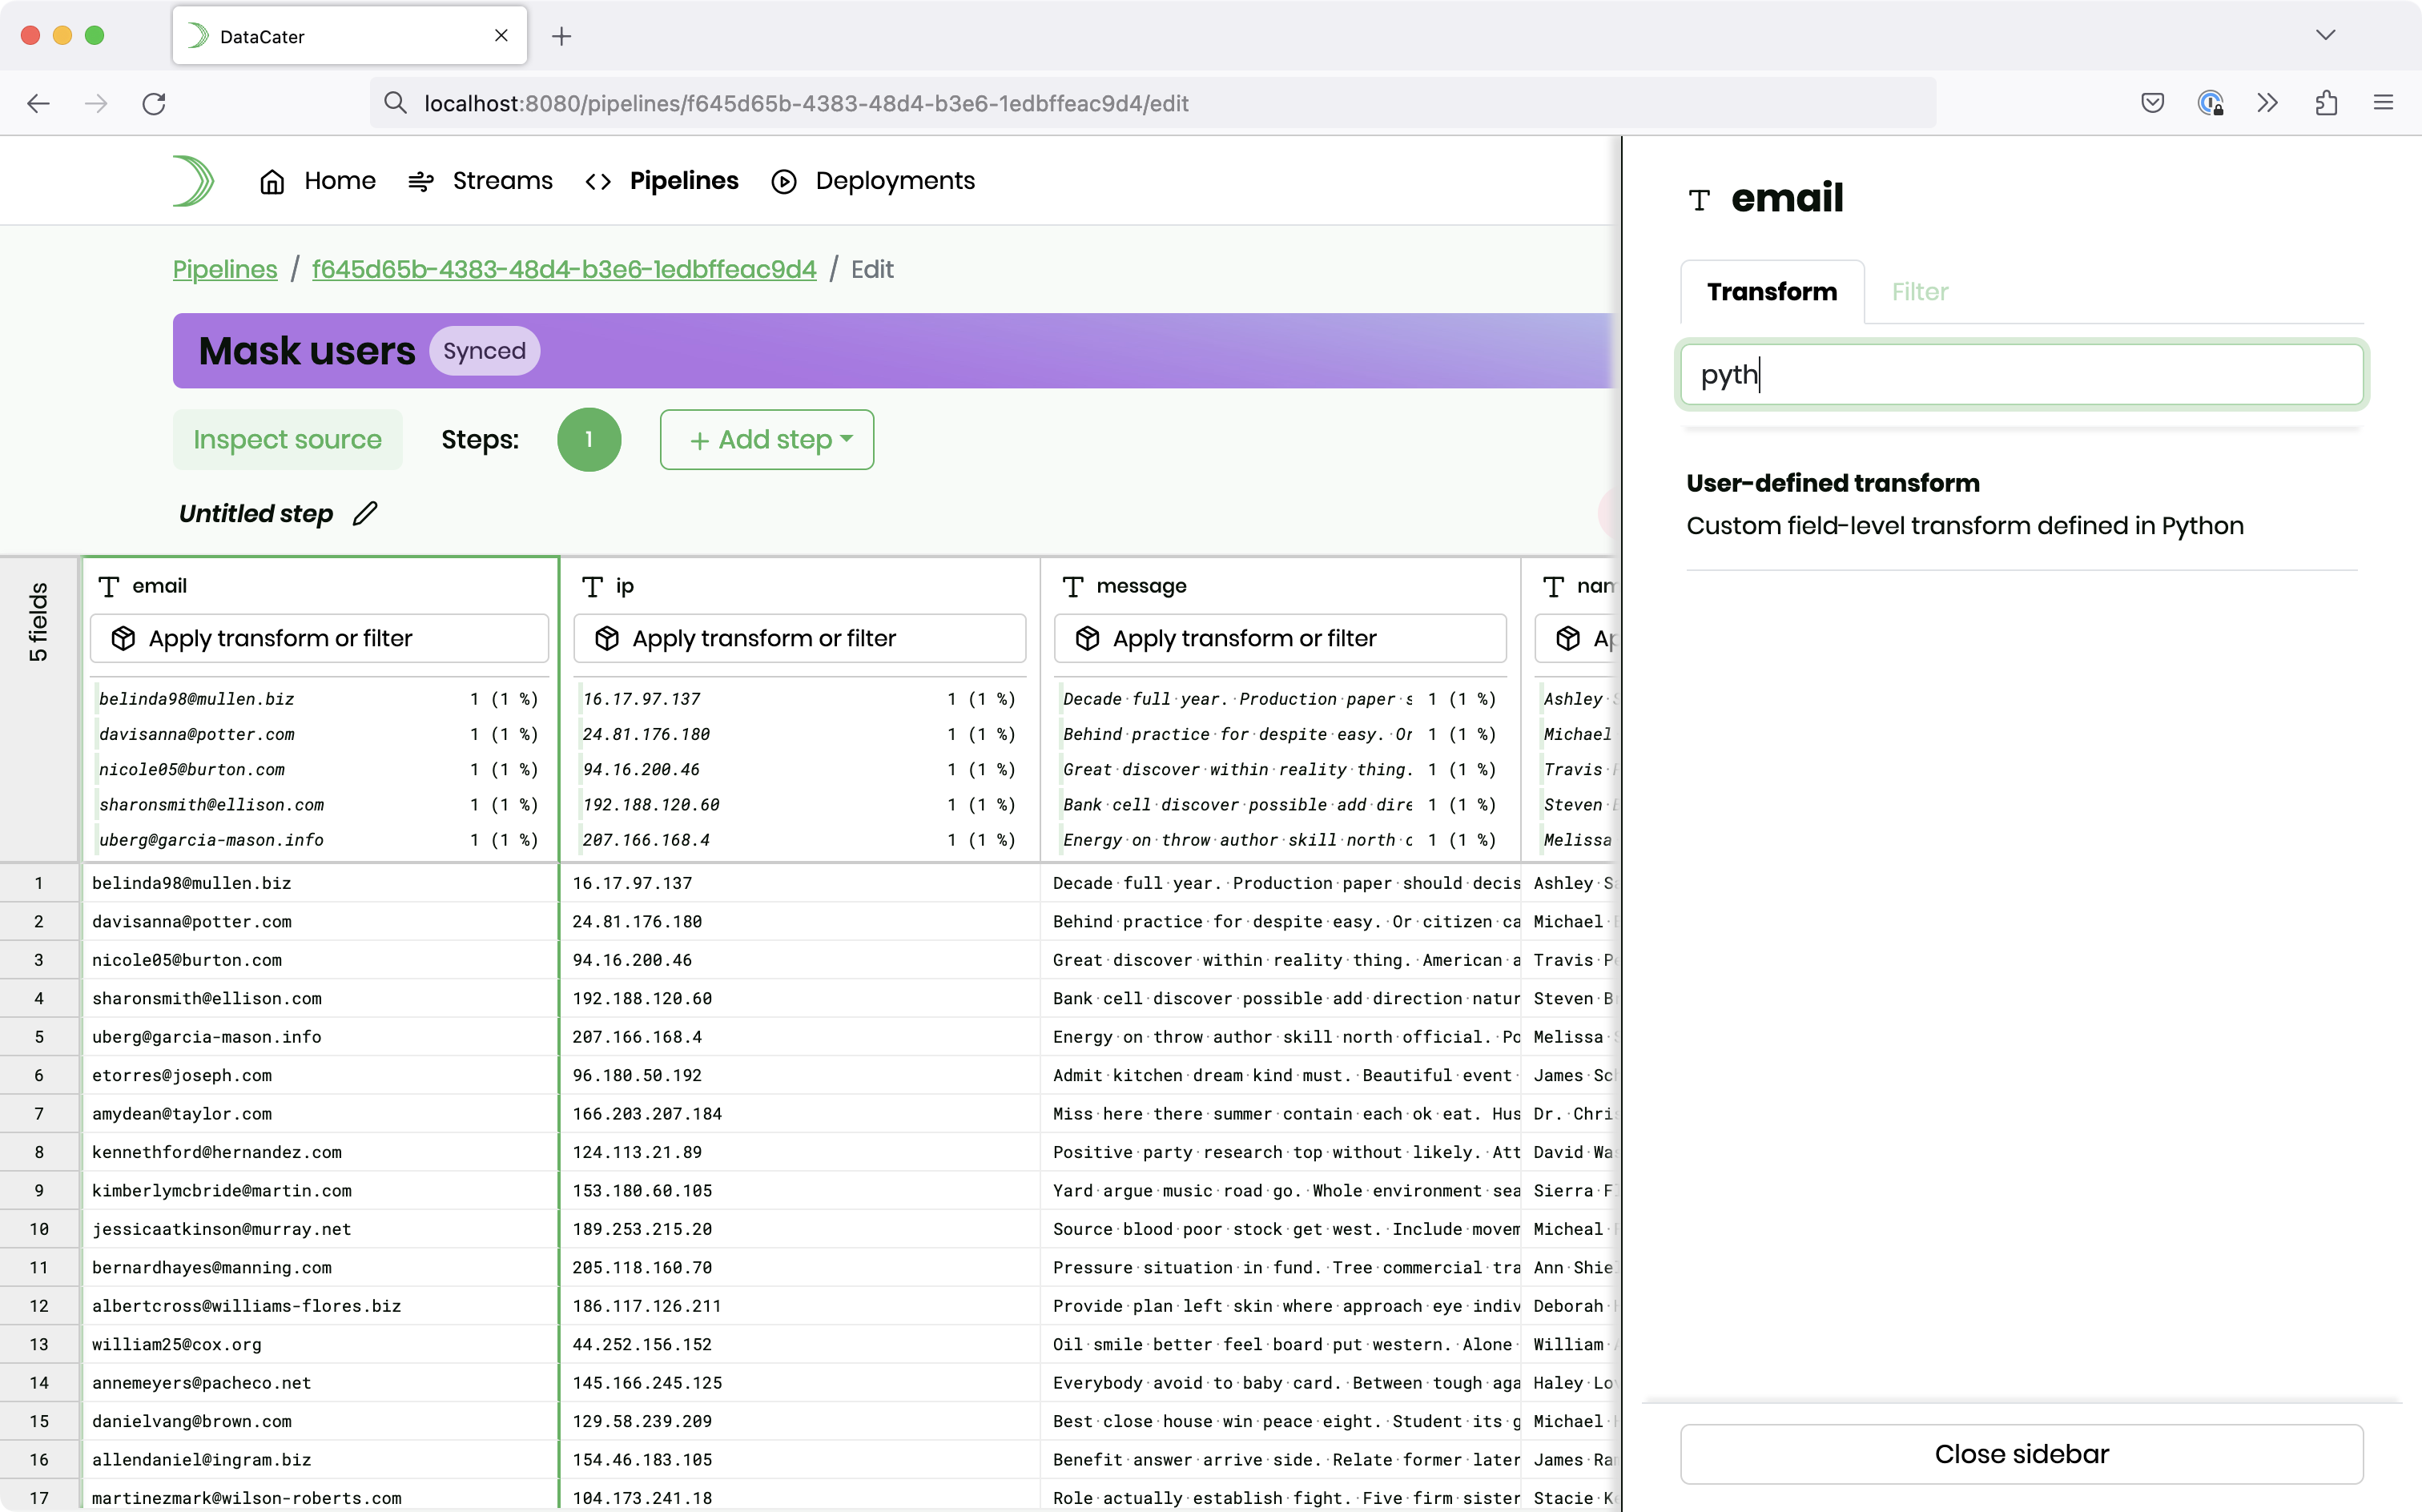
A user-defined transform allows you to provide a custom Python function that takes two parameters: (1) The value of the field that you are applying the function to, and (2)
the entire record as a Python dict. DataCater automatically fills the
return value of the function into the field that you are processing with the
transform.
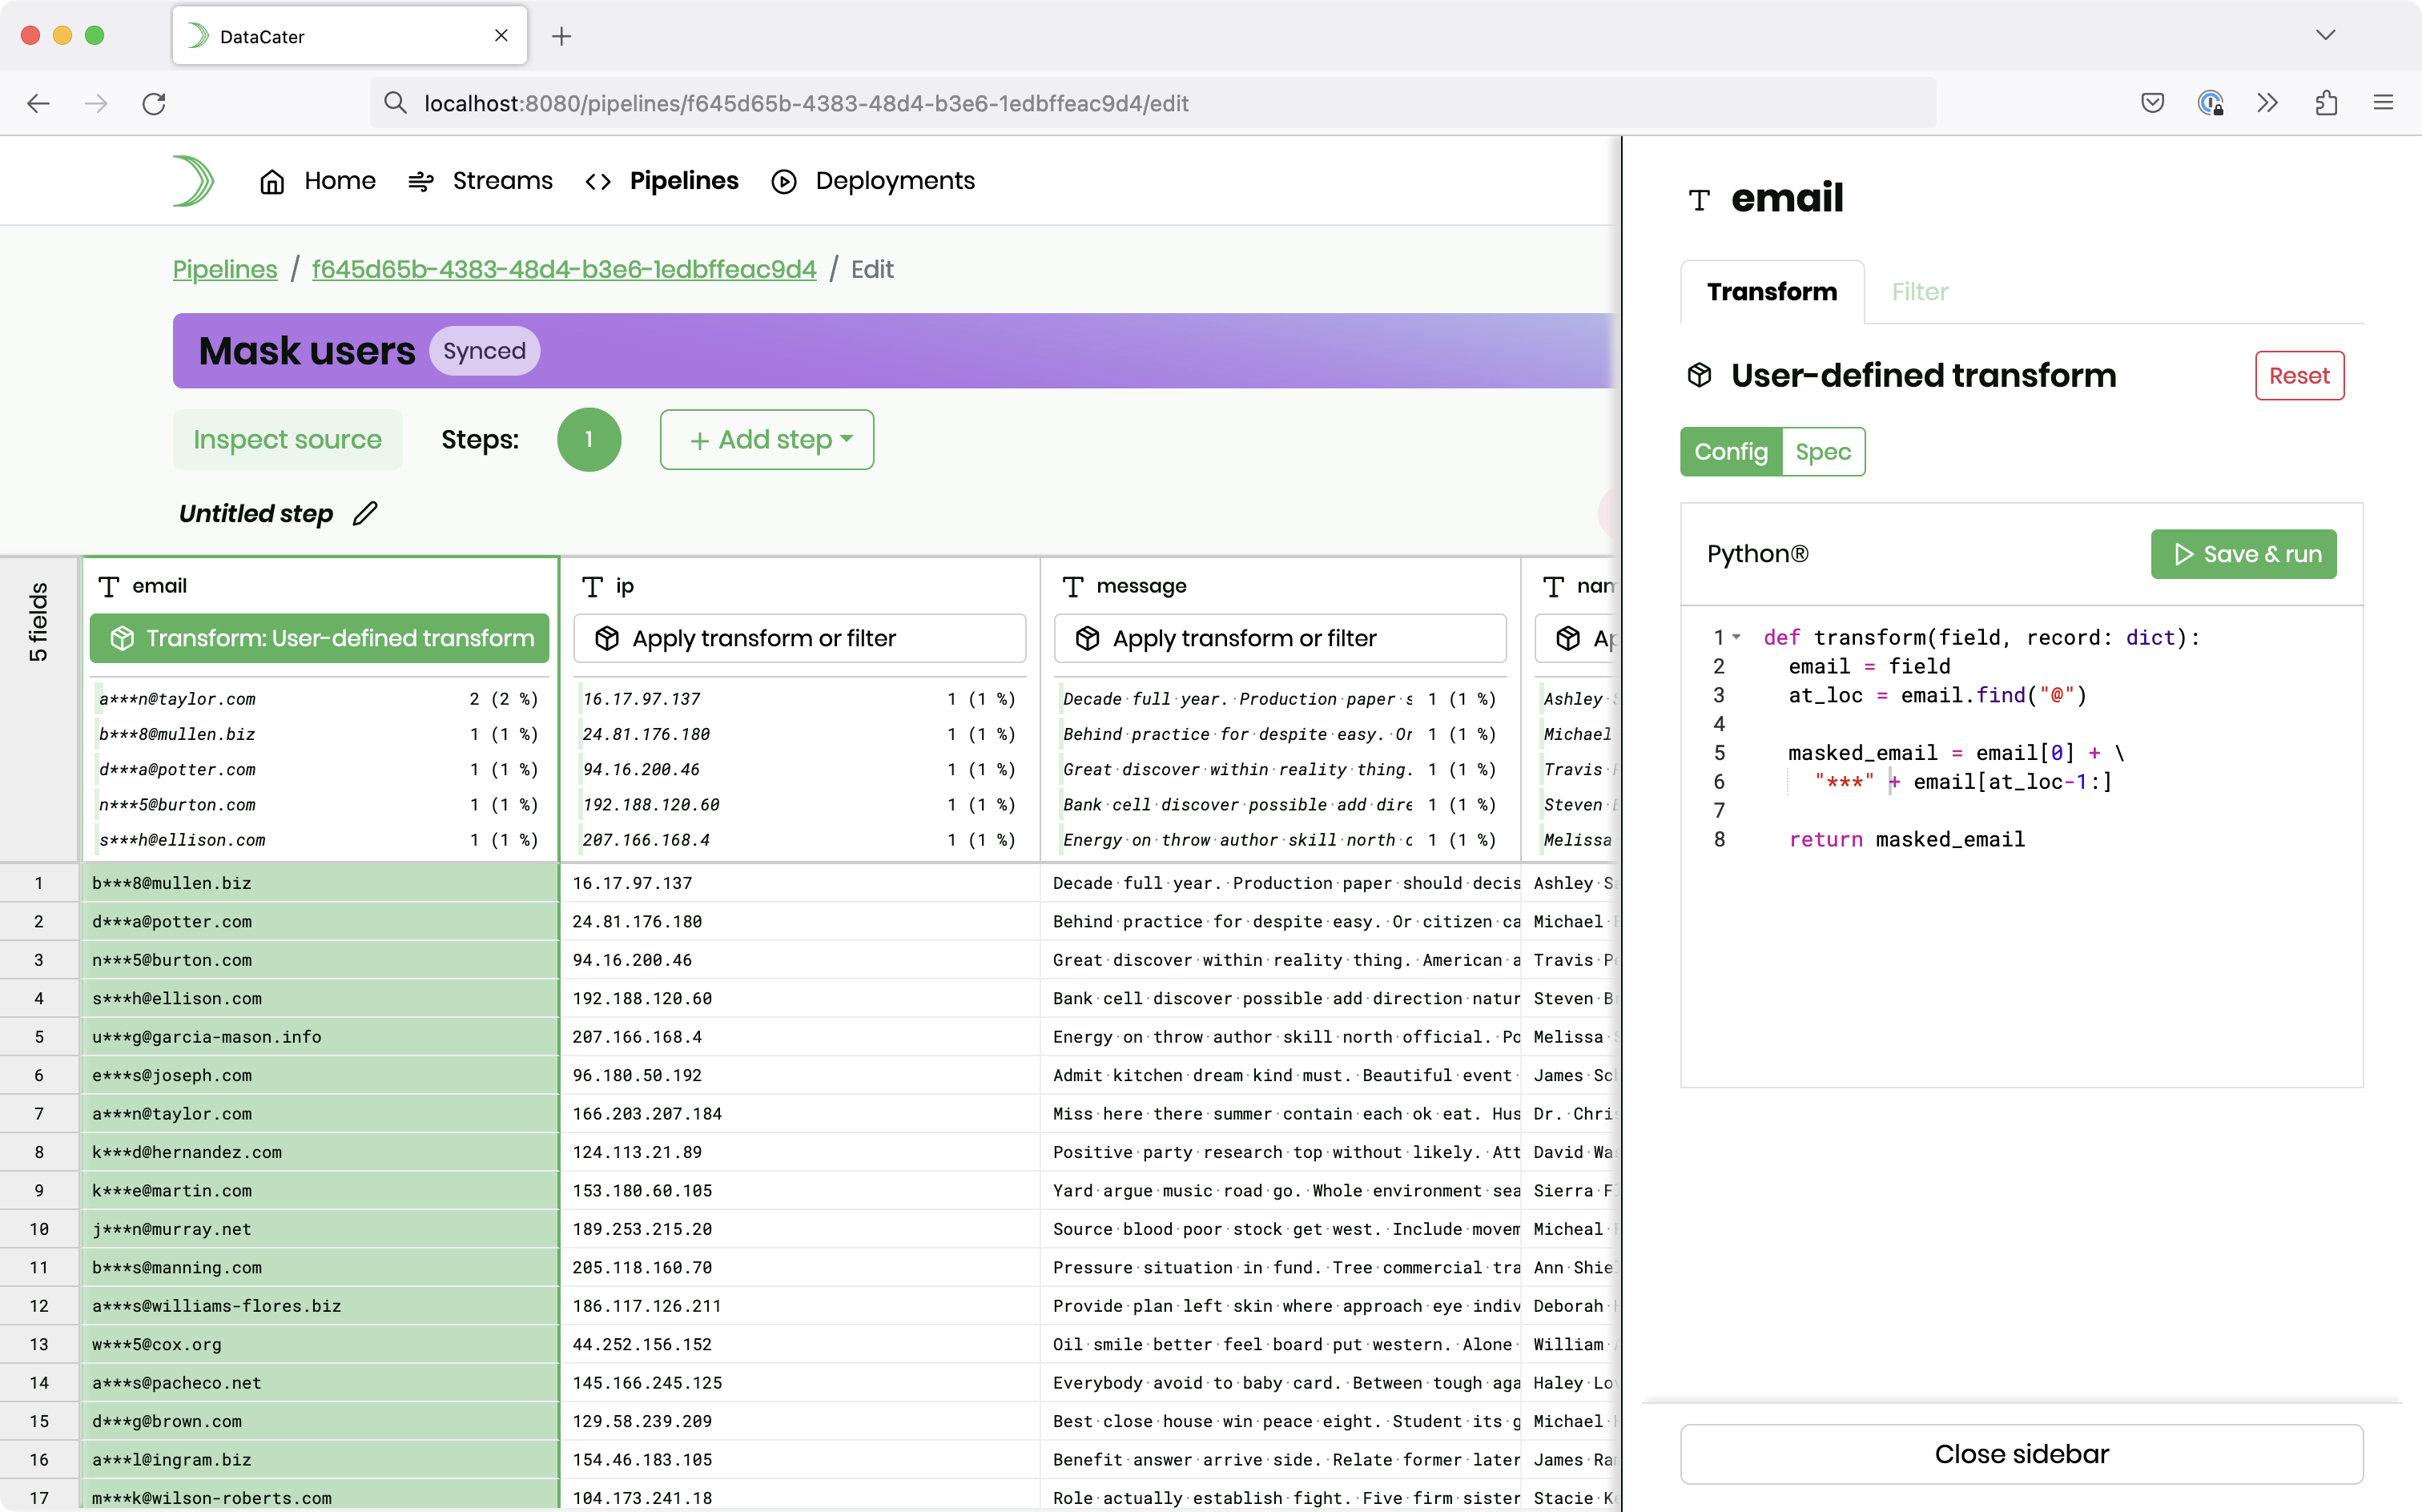
Please fill in the following Python code to mask the first part (before
the @ character) of the email addresses:
def transform(field, record: dict):
  email = field
  at_loc = email.find("@")

  masked_email = email[0] + "***" + email[at_loc-1:]

  return masked_email
After clicking the button Save & Run, you can see the preview in the grid:
If you prefer to create the pipeline programmatically, you can perform the following API call (please make sure to replace the references to the streams with the UUIDs of your resources):
$ curl http://localhost:8080/api/v1/pipelines \
  -H'Authorization: Bearer ACCESS_TOKEN' \
  -XPOST \
  -H'Content-Type:application/json' \
  -d'{"name":"Mask users","metadata":{"stream-in":"06c7f086-ef1a-4a9b-a735-af8ad8223805","stream-out":"efb84d3b-45f7-4b5e-a377-55c68f56889e"},"spec":{"steps":[{"kind":"Field","fields":{"email":{"transform":{"key":"user-defined-transformation","config":{"code":"def transform(field, record: dict):\n  email = field\n  at_loc = email.find(\"@\")\n\n  masked_email = email[0] + \\\n    \"***\" + email[at_loc-1:]\n\n  return masked_email"}}}}}]}}'
In the previous steps, we ingested test data into Redpanda, connected DataCater with Redpanda, and defined a custom data masking function in Python. Now, it is time to start streaming.
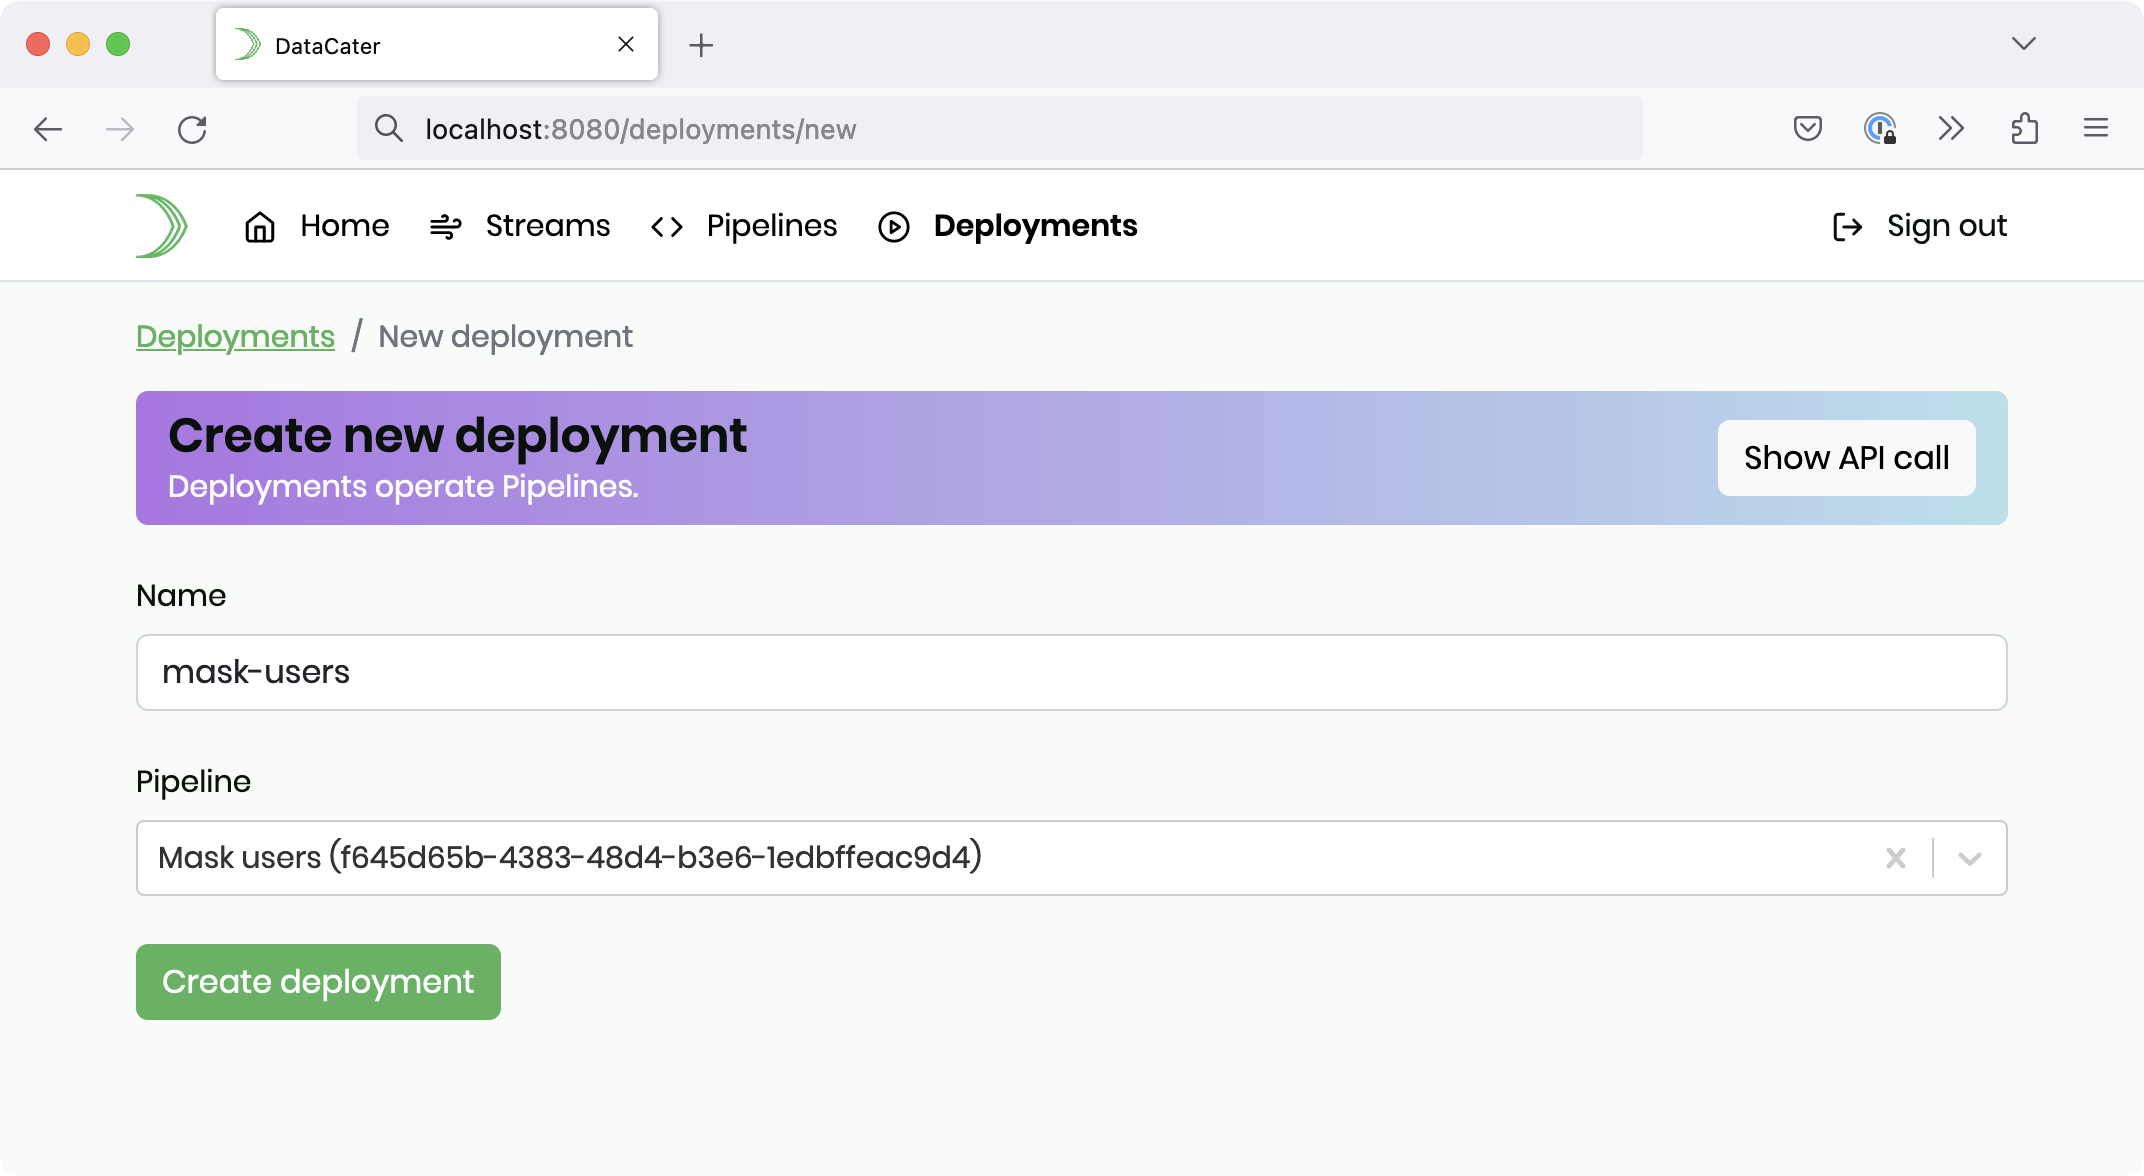
Please navigate to Deployments and click Create new deployment.
Please provide a name for your deployment, for instance, mask-users, and select the pipeline that you just created. Finally, click the button Create deployment.
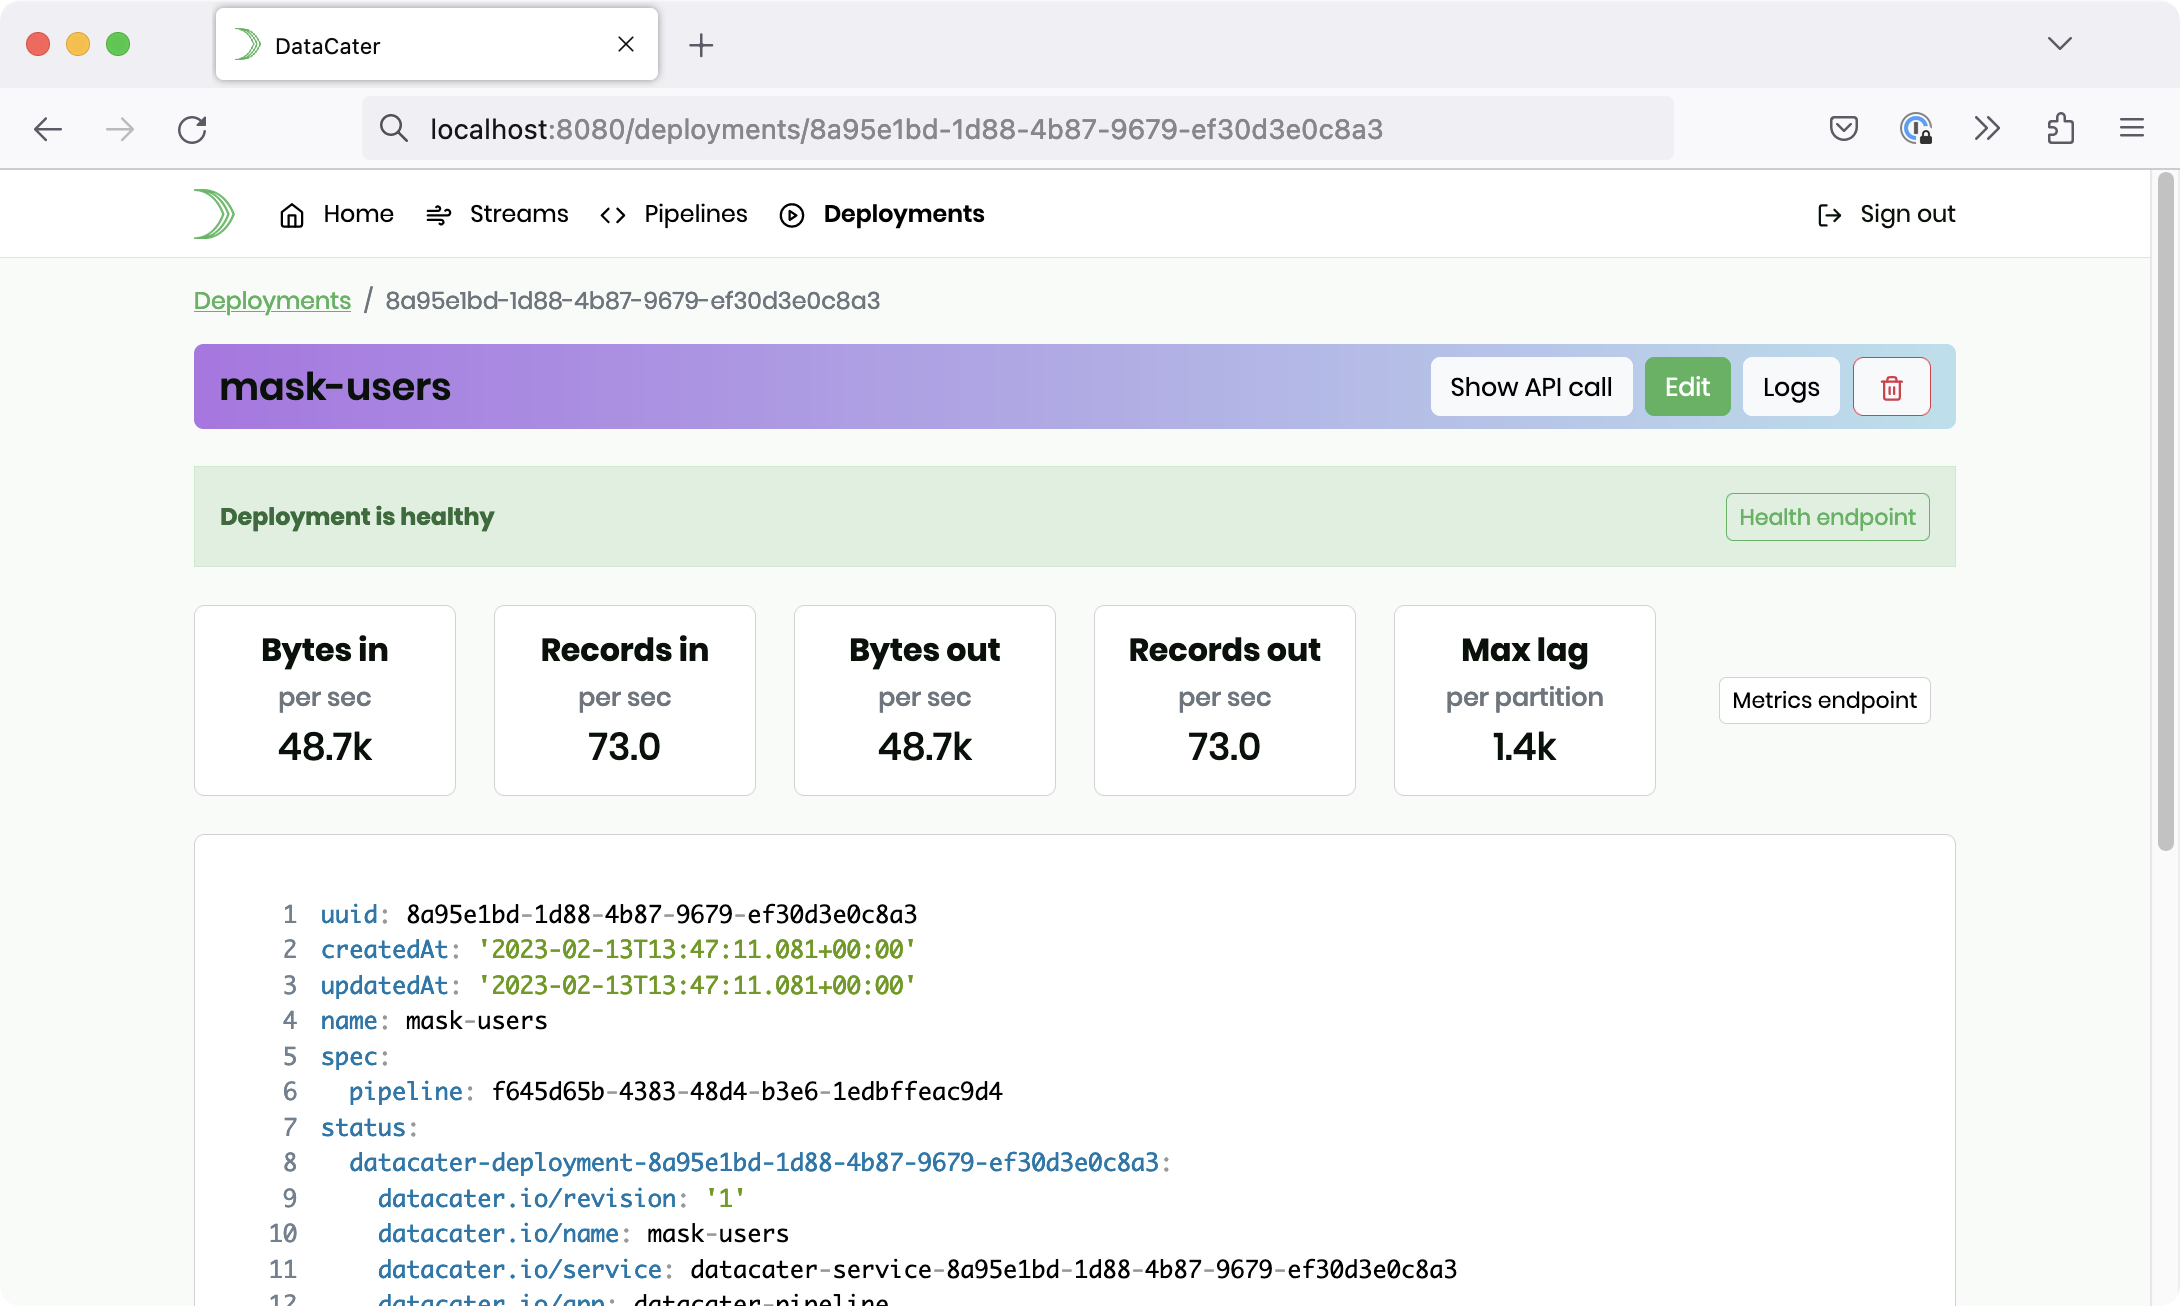
Within a few seconds, the deployment should start streaming the records
from the Redpanda topic users to
the topic users_masked and mask
the field email on the way using
the custom Python function that we built:
You can execute the following command to inspect the sink stream containing the masked data:
$ kubectl exec -it redpanda-0 -- rpk topic consume users_masked --brokers='redpanda-0.redpanda.default.svc.cluster.local.:9093'
If you prefer to create the deployment programmatically, you can perform the following API call (please make sure to replace the reference to the pipeline with the UUID of your resources):
$ curl http://localhost:8080/api/v1/deployments \
  -H'Authorization: Bearer ACCESS_TOKEN' \
  -XPOST \
  -H'Content-Type:application/json' \
  -d'{"spec":{"pipeline":"f645d65b-4383-48d4-b3e6-1edbffeac9d4"},"name":"mask-users"}'
We built a streaming data pipeline that masks email addresses in real-time. While this tutorial used Redpanda as the implementation of the Kafka protocol, it can be applied to any Kafka API-compatible broker. It is not limited to streaming data between the same Kafka cluster but can also be used for streaming data between different clusters, which can be very attractive if you, for instance, need to apply transforms when streaming from your production to a pre-production environment.
We used email addresses as an example. Thanks to Python’s flexibility, you can easily develop data masking functions for other data types as well. For instance, the following transform replaces the last block of an IPv4 address:
import ipaddress

def transform(field, record: dict):
  ip_address = ipaddress.ip_address(field)

  return ipaddress.ip_address(int(x) & 0xffffff00)
Feel free to check out our code on GitHub - we appreciate your feedback!